Getting started with serverless data engineering services on AWS
Need to assess different tools, but don't have the time to set everything up? Find out how you can start experimenting on AWS in just a few minutes!

Many data engineering solutions exist to ingest and process data to gain insights or feed your applications. However, many of these solutions require a large upfront investment or are limited in functionality when starting out. AWS fortunately provides all capabilities required to build your solution out of the box. However, there is one challenge: the skills required to integrate these building blocks can initially take quite some time.
This blogs helps you with setting up a quick but solid foundation to test the most commonly used serverless data engineering services, like S3, Glue and Athena, including network connectivity and all the required permissions out of the box! Isn't that easy!
Why a serverless data lake on AWS?
Before we start, lets quickly elaborate on why to choose for a serverless data lake architecture on AWS. First of all, if you're still experimenting, going serverless is a great way to get started because you only pay for the storage and compute that you use. If it's just a few GB of data and dozens of jobs, you probably won't even notice the cost!
Moreover, as you are extending your datalake, serverless services help you minimize time spent on managing infrastructure and let you spend more time on building business value instead!
How to get started with serverless data engineering on AWS?
To help you get started, I've created a lightweight github project that deploys the main infrastructural components that you need to get started. It can be found here. We will build the following architecture:
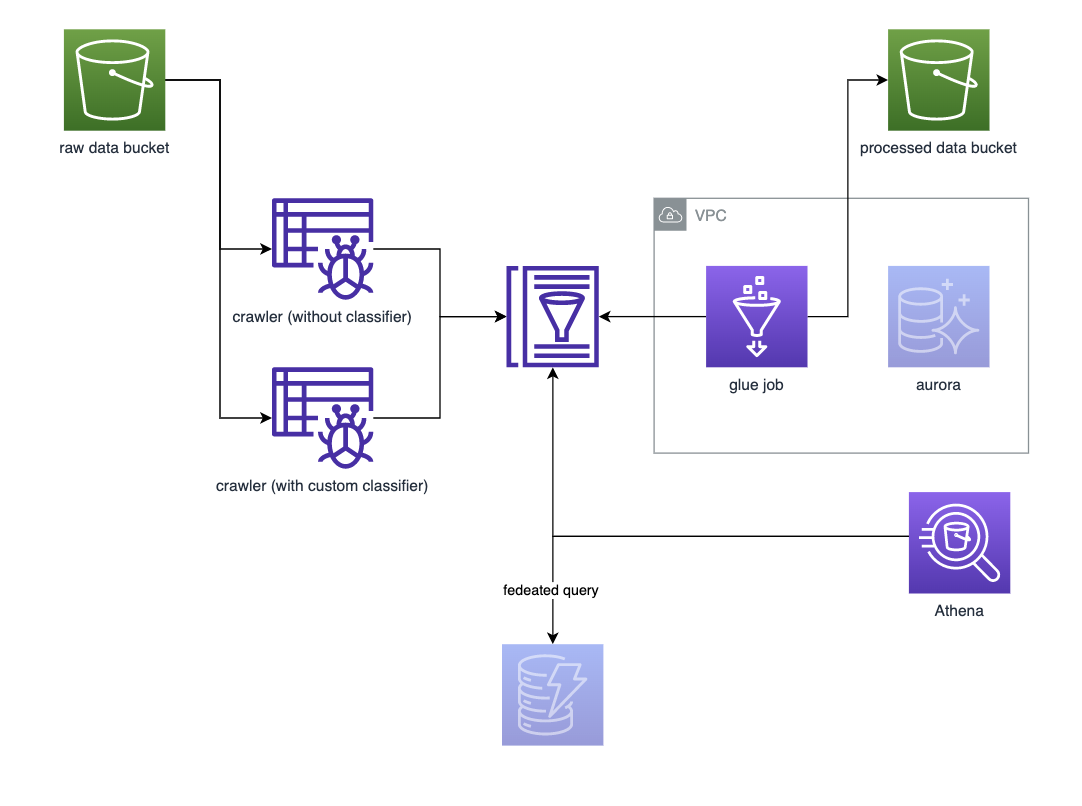
NOTE: The greyed out components are optional and you can add them and experiment with them yourself.
As you can see, two buckets are deployed containing raw and processed data. Glue crawlers are used to classify and collect metadata. An ETL job is provided as well which transforms the data to parquet format.
Prerequisites
Since this project makes use of the python version of the AWS Cloud Development Kit (more info here ), make sure you have set up your local workstation with at least python version 3.X, the node package manager (npm) and have AWS access (e.g. running the AWS CLI with a command like aws sts get-caller-identity should work without problems).
Prepare the app and the dataset
To start, run the following script:
git clone https://github.com/LRuttenCN/cdk-serverless-data-lake-sandbox.git
cd cdk-serverless-data-lake-sandbox
python3 -m pip install -r requirements.txt
sudo npm install -g aws-cdk@2.25.0
./get_imdb_datasets
This script:
- Clones the repository
- Install all requirements (if you don't have a
python3binary but just a regularpythonbinary, modify the script to use that one instead). - Make sure you have a compatible version of the
cdk cliinstalled (runcdk --versionto check). This repo is tested with version 2.25.0. - Creates an
assetsfolder, and fetches the IMDB dataset and stores them in this folder.
Deploy the solution
To deploy the solution, perform the following steps:
First, modify
app.py:env_EUto the region of choiceDEMO_IDa unique and recognizable identifier for your use-case (e.g.sandbox)Customize the demo environment by adding the following components to the stack:
DemoStack(...).withAthena().withCustomClassifier().withGlueJobForNameBasicsDataset().withDataDeployment(). For example, yourapp.pynow looks like this:#!/usr/bin/env python3 import aws_cdk as cdk from stacks.demo_stack import DemoStack env_EU = cdk.Environment(region="eu-central-1") DEMO_ID = "workshop" app = cdk.App() # Per account/region, provide a unique demo_name per stack DemoStack(app, f"demo-data-{DEMO_ID}", demo_name=DEMO_ID, env=env_EU).withAthena().withCustomClassifier().withGlueJobForNameBasicsDataset().withDataDeployment() app.synth()
Secondly, run
npx cdk bootstrapto prepare your AWS account for usage with CDK. It should automatically detect the region for your app and bootstrap the correct region.Lastly, run
npx cdk diffand thennpx cdk deploy. This takes about 20 minutes, depending on your file upload speed (±2GB of data).Alternatively, you can choose to omit the
.withDataDeployment()to not let CDK deploy the data, but do it yourself using the CLI or AWS management console. Note however that this will probably break the provided crawlers and ETL jobs, since they rely on a given naming convention for the files and folders in the raw data bucket.
Experiment!
If everything went well, your sandbox environment should be up and running! For example you can:
- Explore the datasets in the raw data bucket (named
***-raw-data-bucket-***).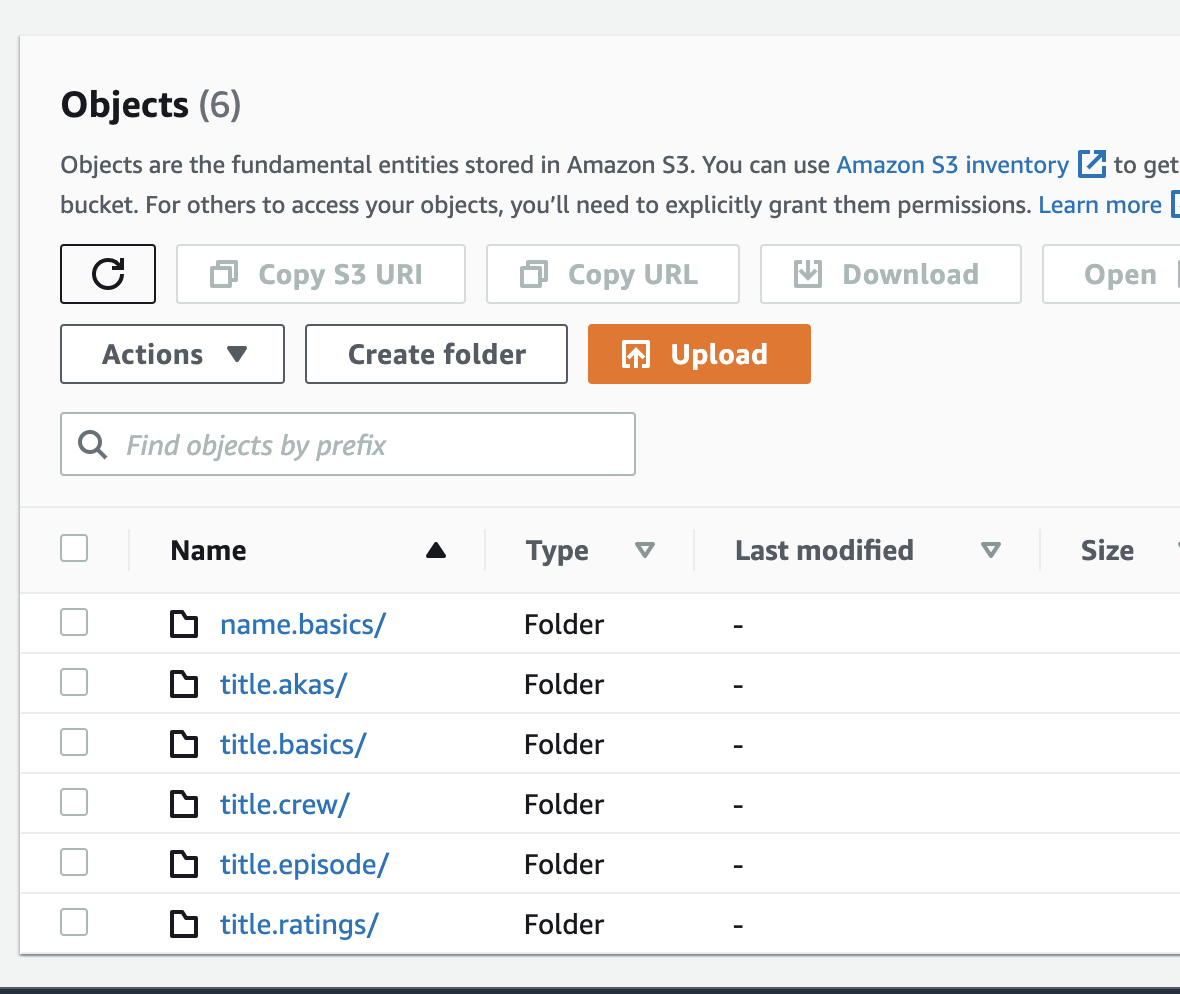
Note: You might see more or less datasets, depending on which ones you have chosen to upload.
- Run the AWS glue crawlers and look at the results in the
Tablespage of AWS Glue.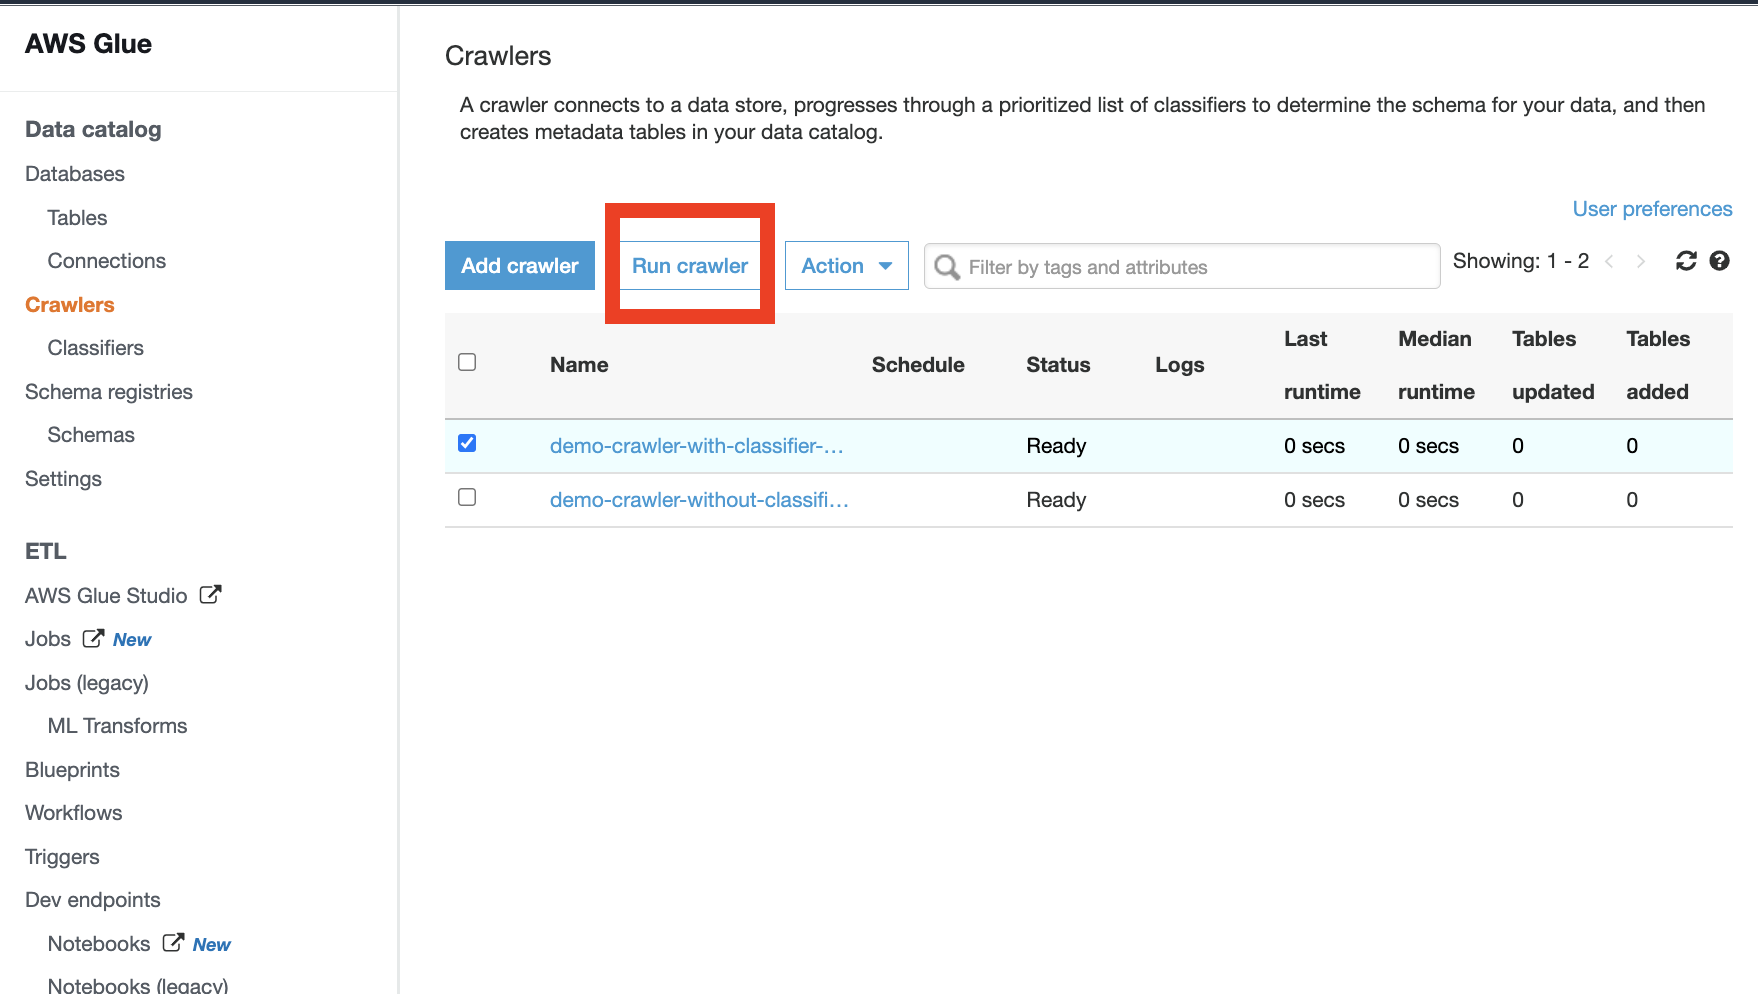
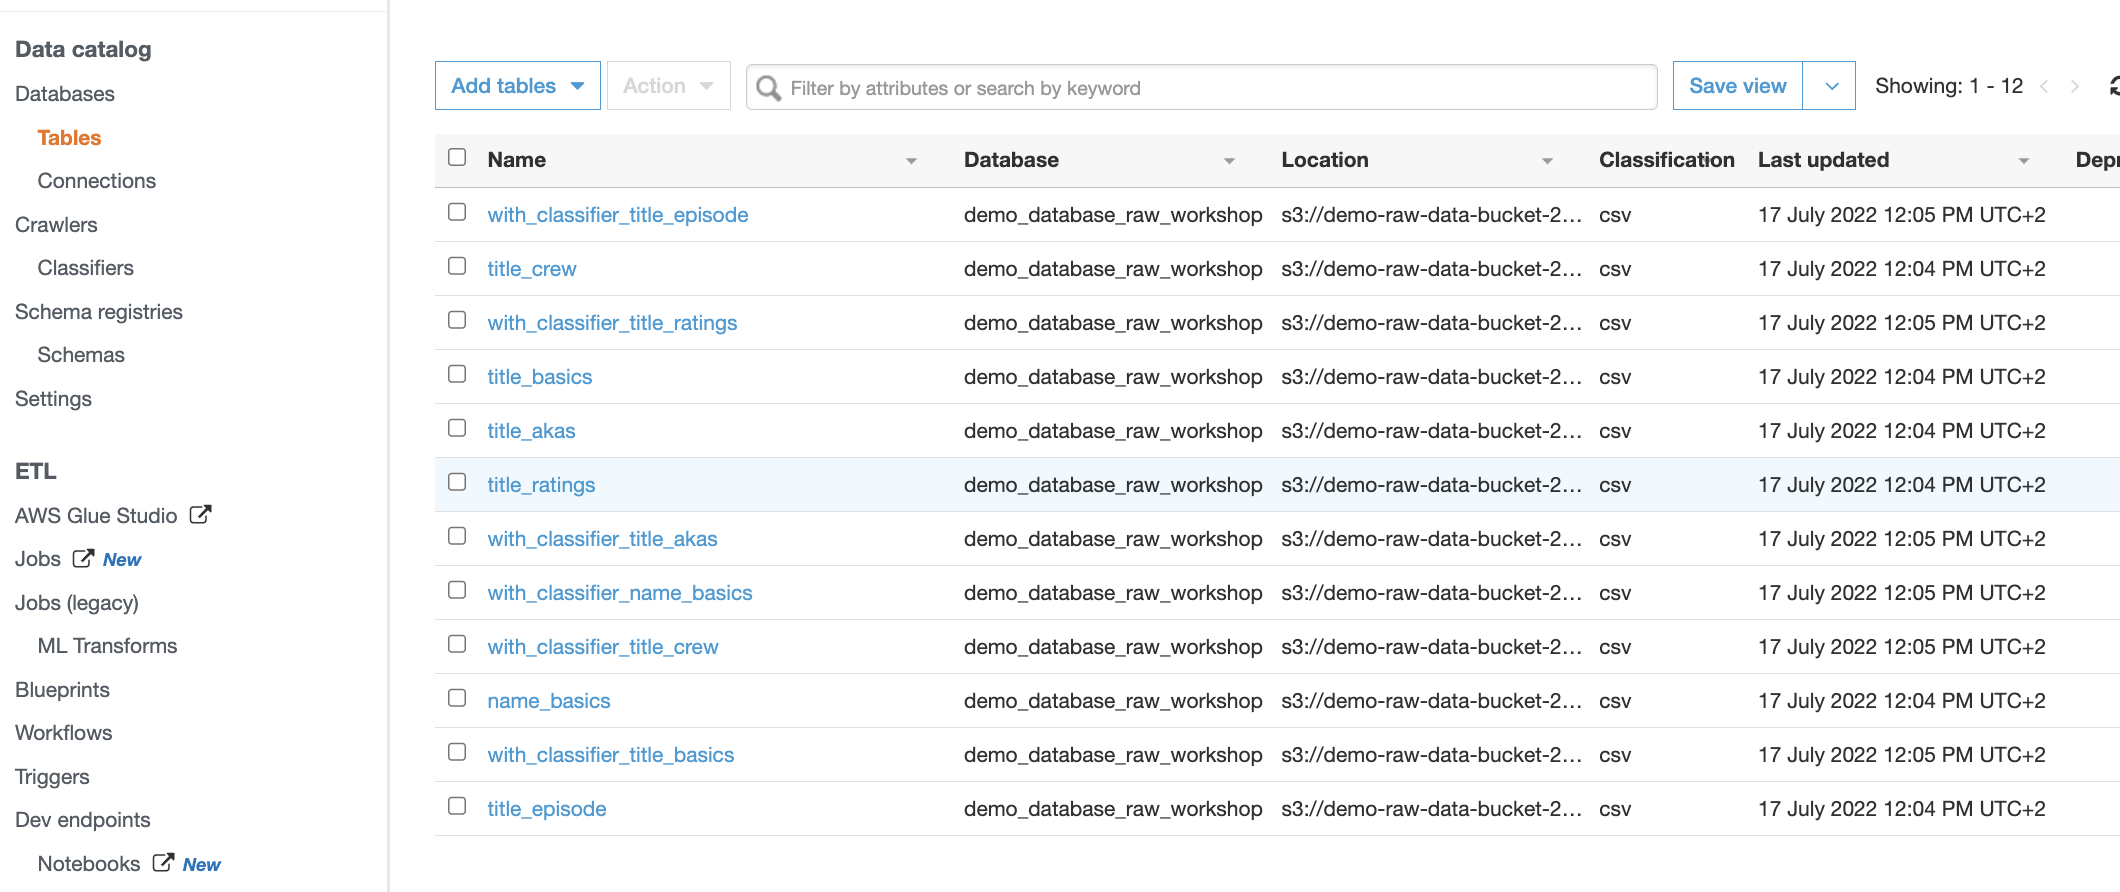
Note that both crawlers have different results for the
name.basicsdataset! This is because this dataset has only string columns. Without the custom classifier it assumes the header row is just another row of string data. By using the custom classifier, we can enforce the detection of a header row, giving more accurate results for this dataset. - Start experimenting with
Glue studioand create a visual ETL job to transform and partition your raw data to the processed data bucket!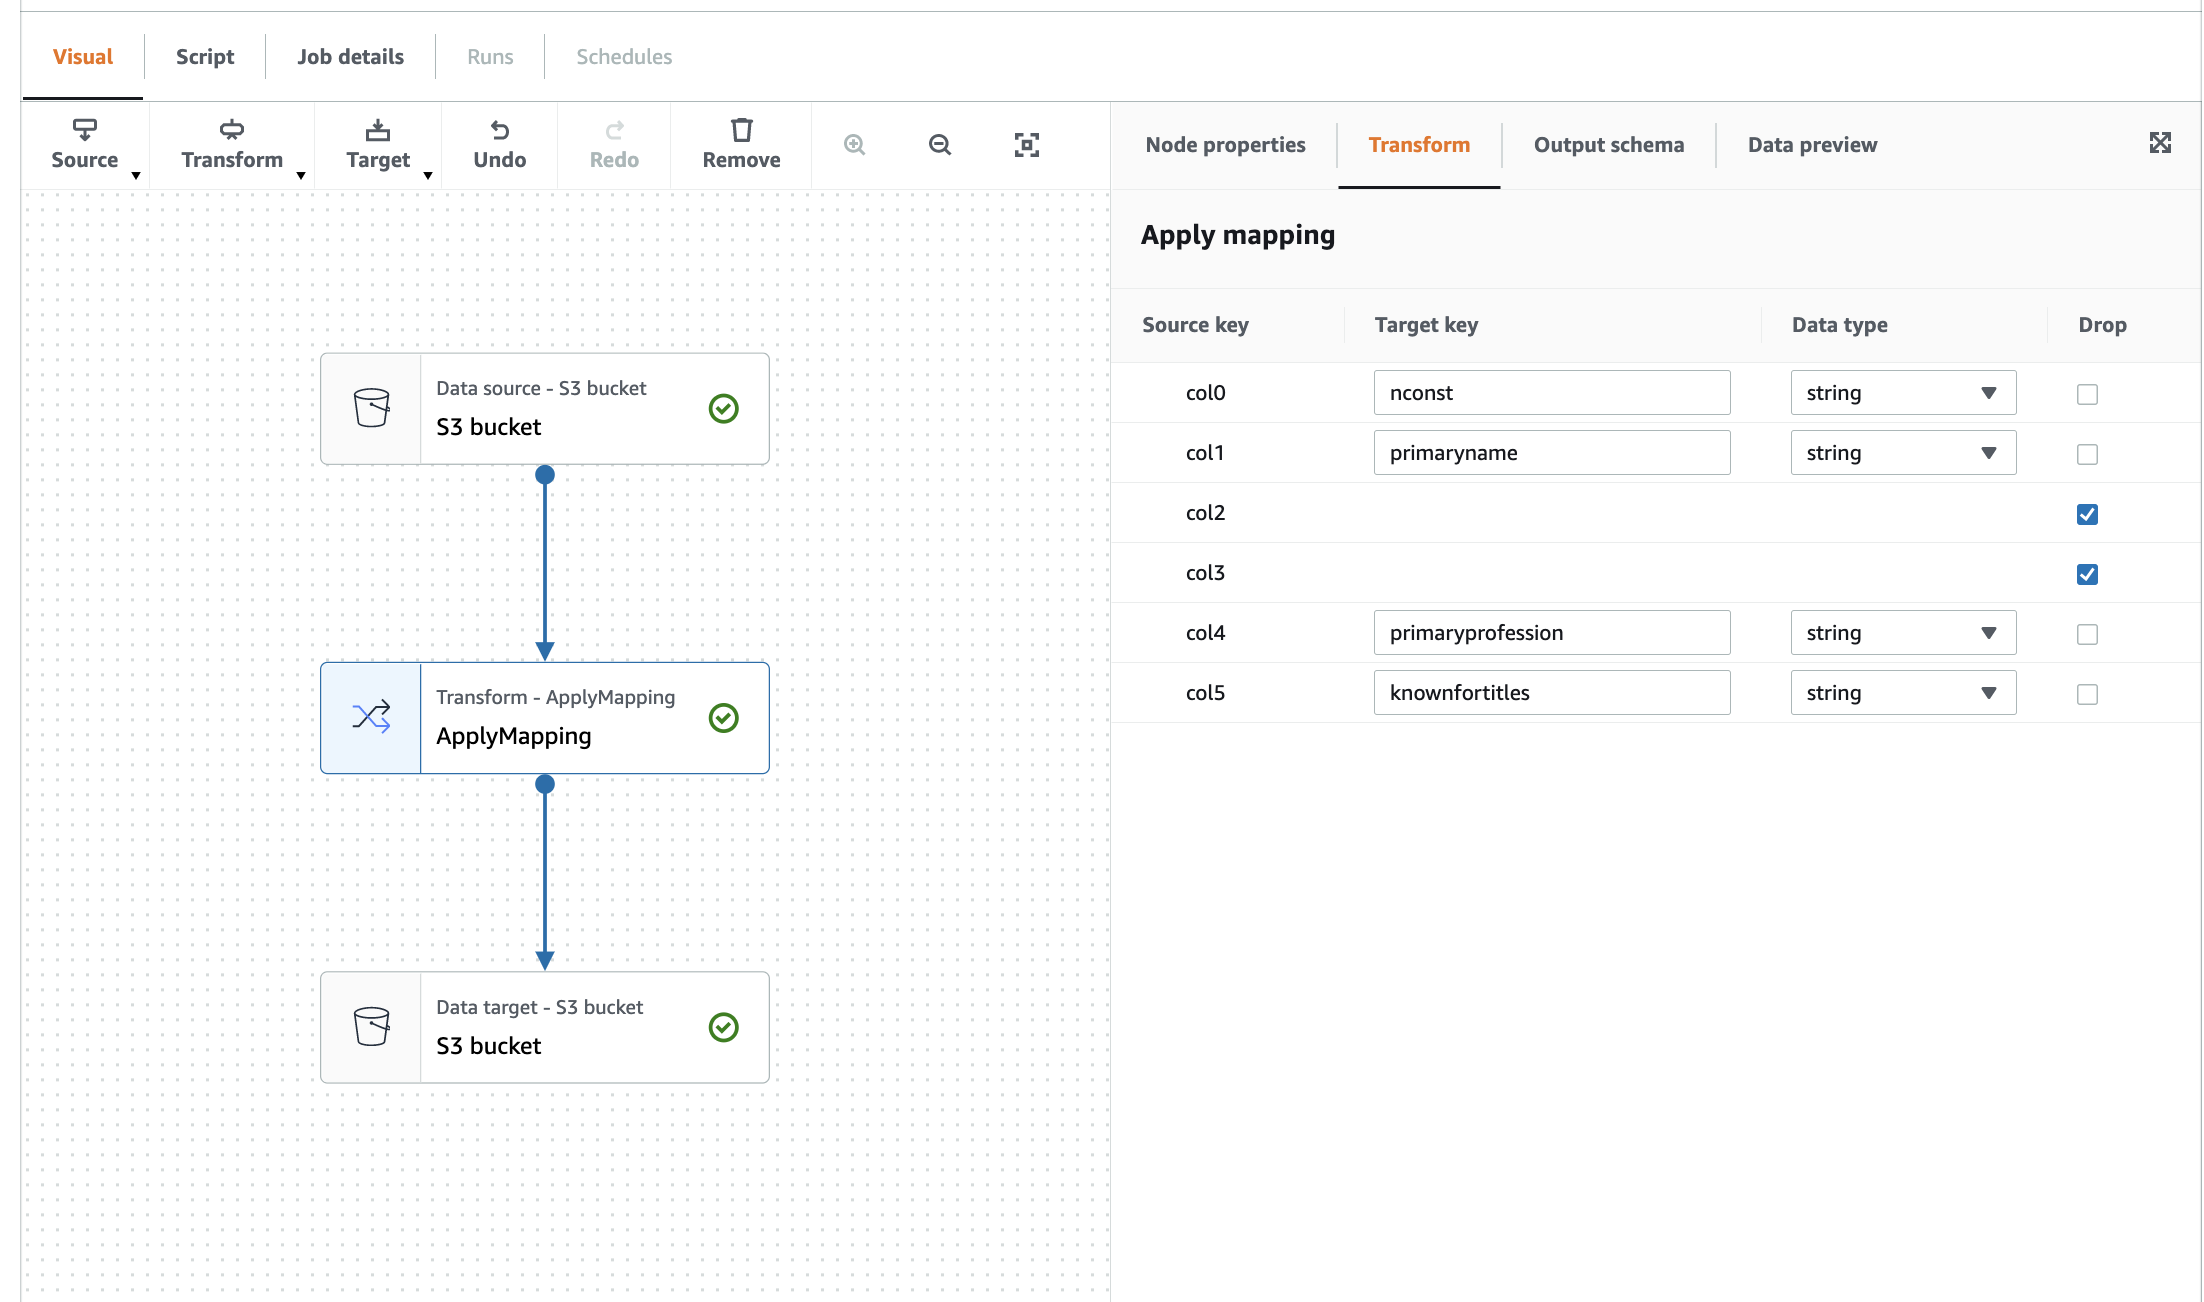
- Use Athena to perform queries on the crawled datasets. Make sure to select the prepared workgroup when first using Athena. You can find example queries in the
Saved queriestab.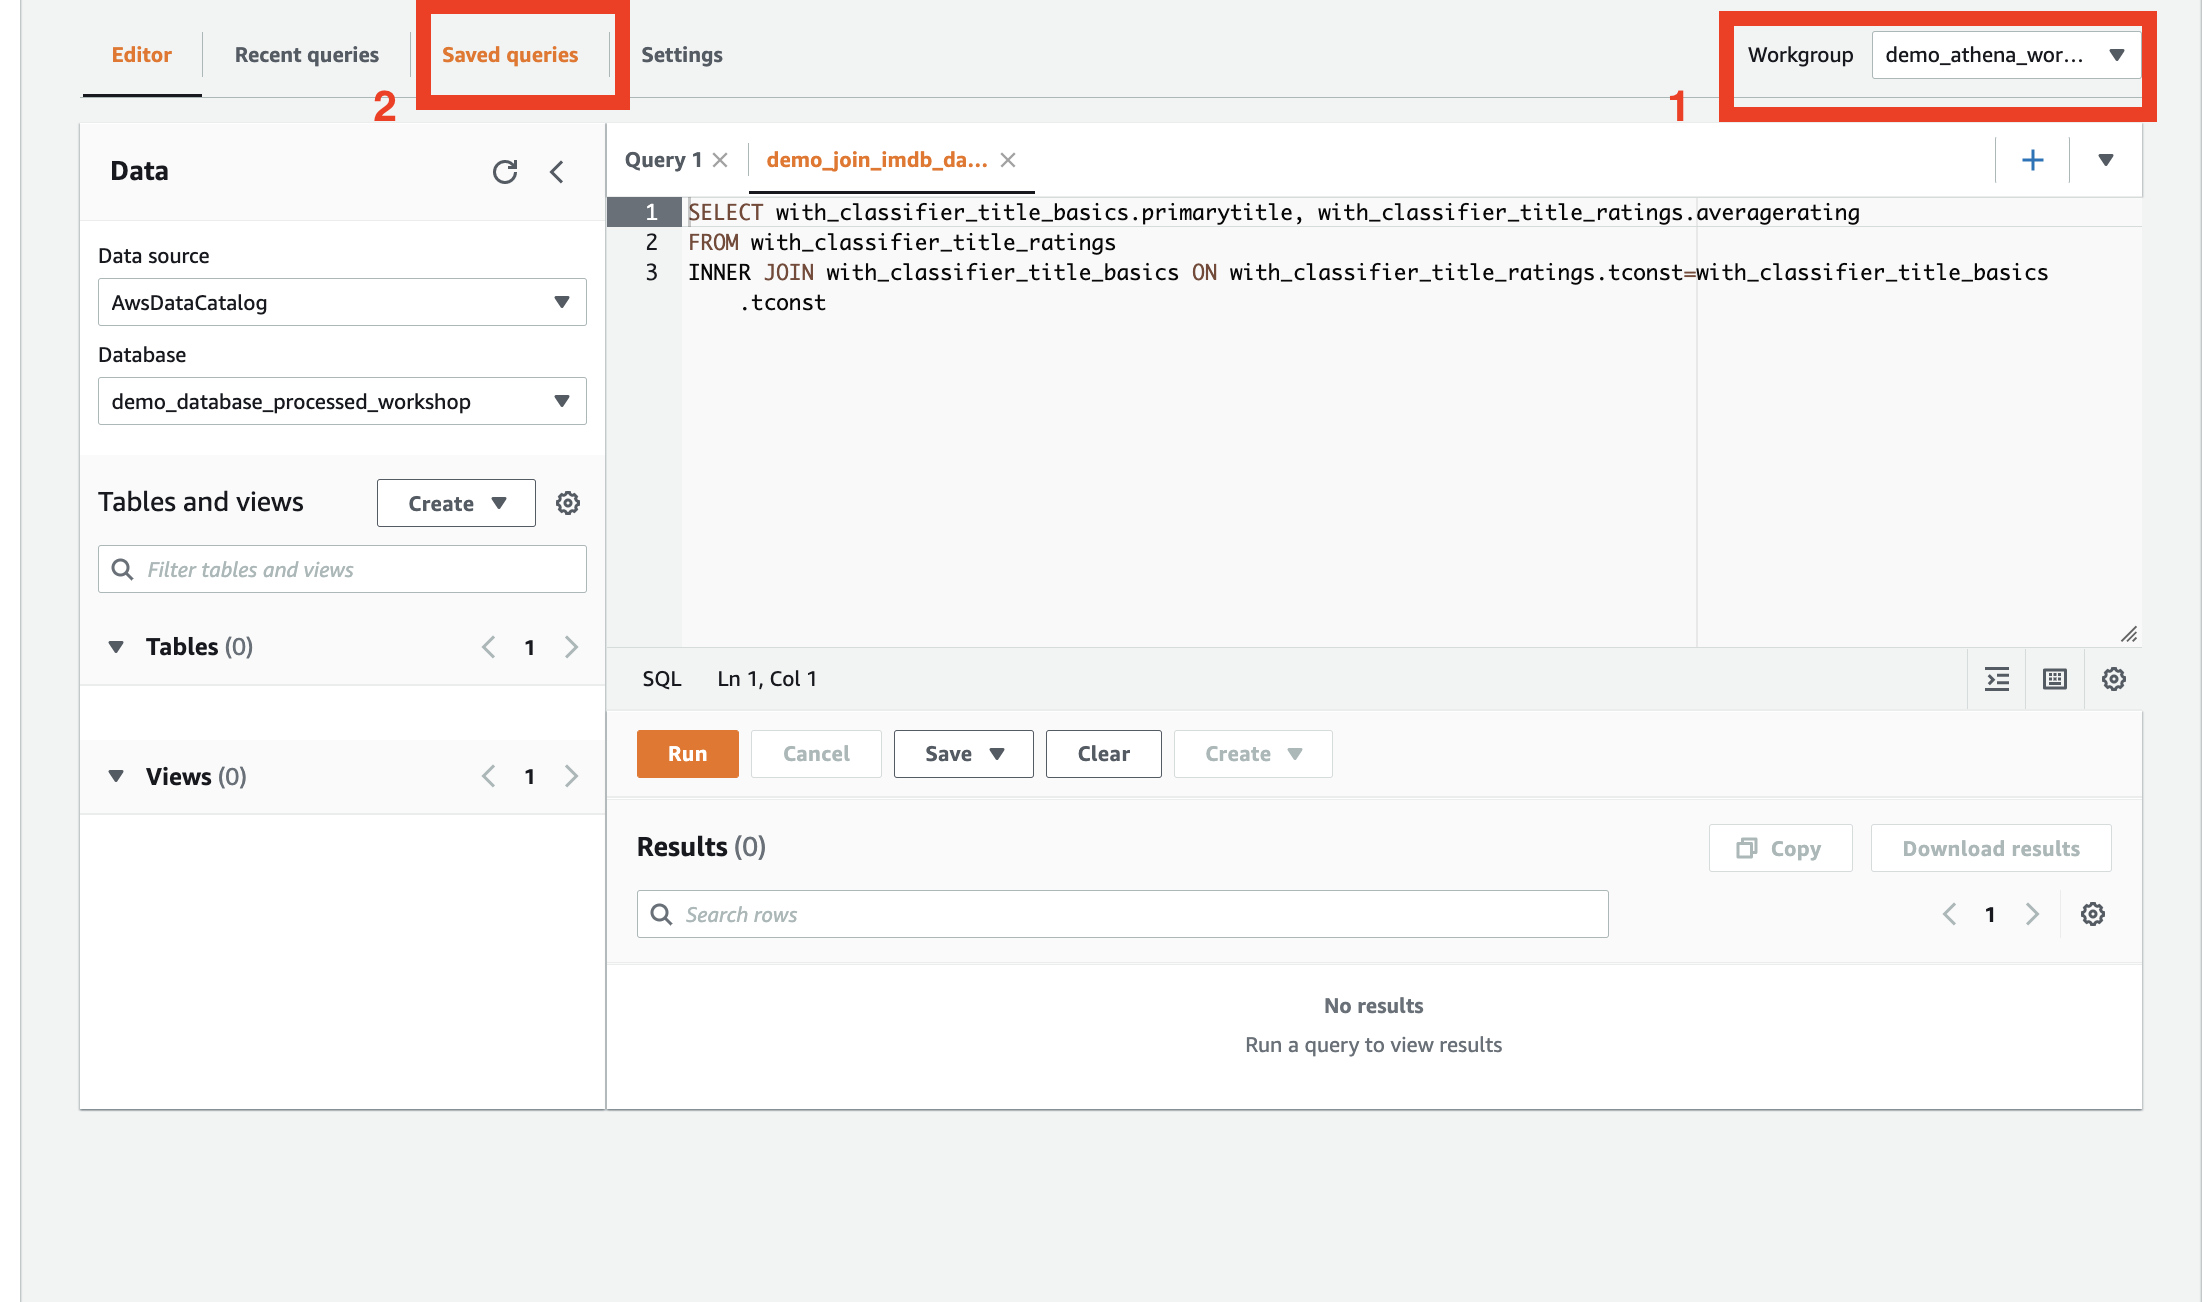
- Visualize the crawled dataset with AWS Quicksight!
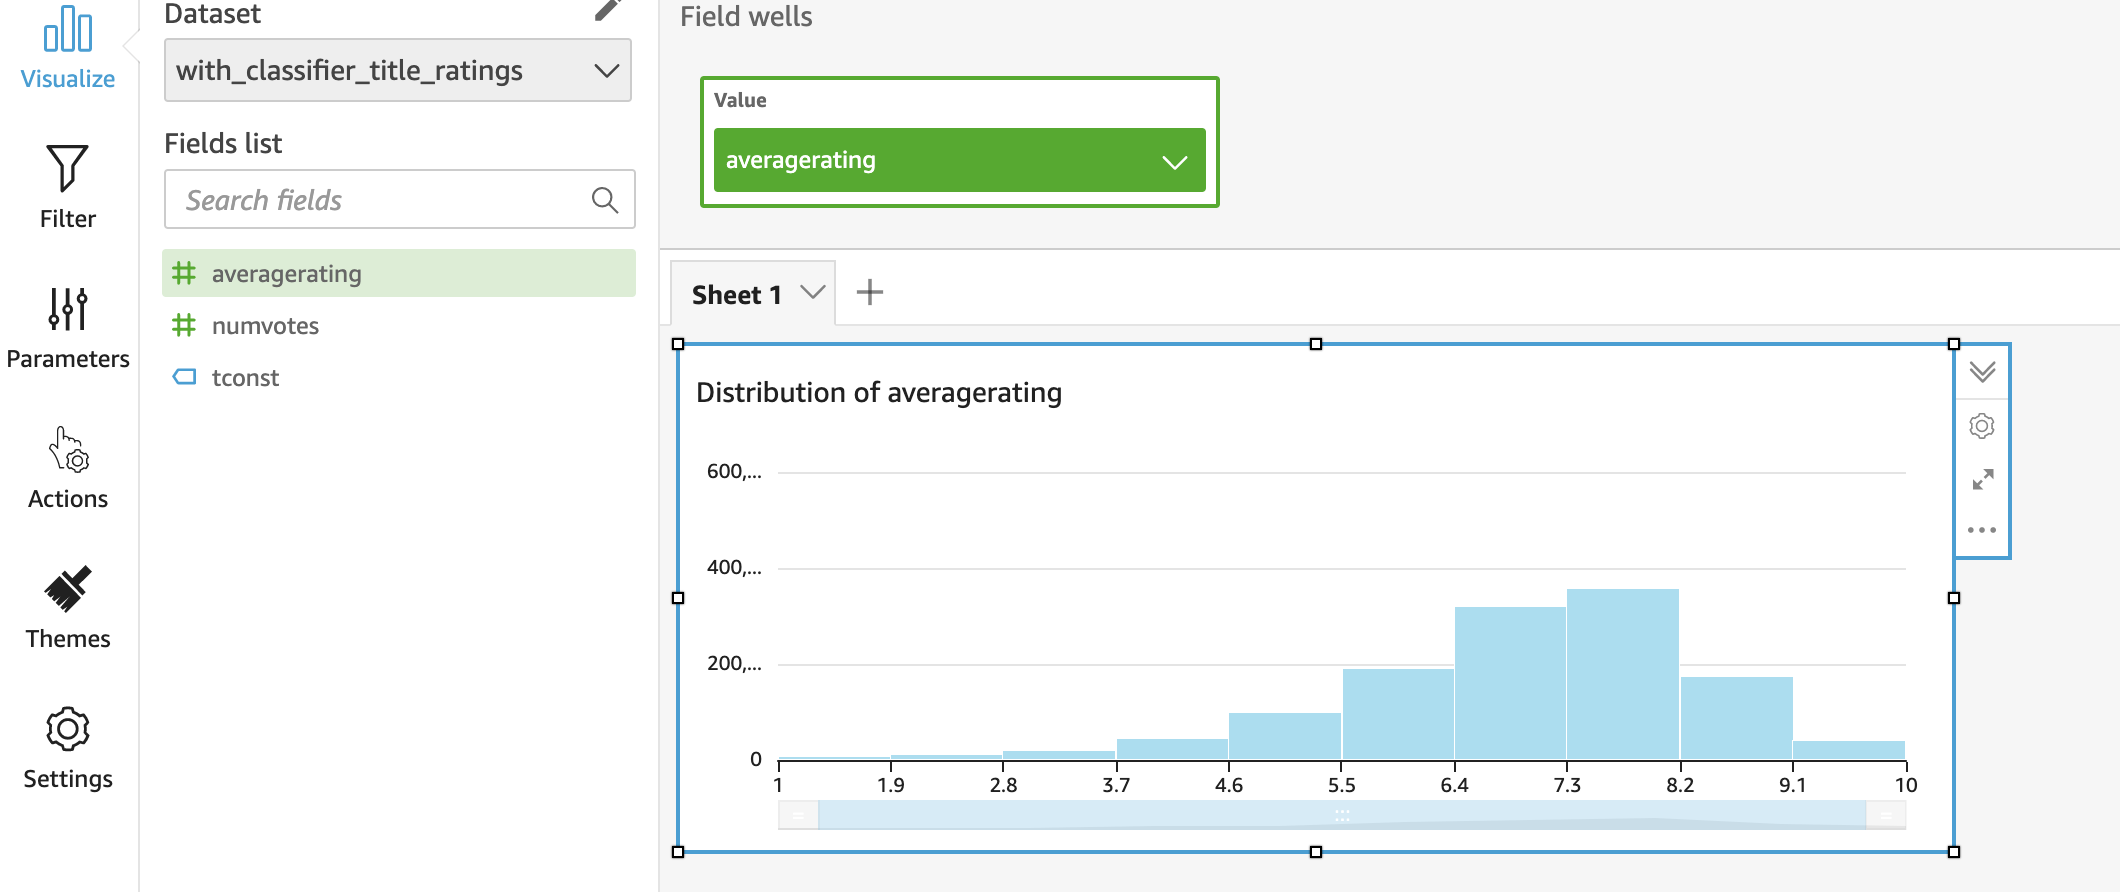 .
.Note that this requires a bit more setup which is not provided by the sandbox repository. Alternatively, if you wish to use a different visualization tool, most tools have connectors available that integrate very well with S3.
Destroy the stack
To prevent unwanted cost, you can destroy the demo environment by running npx cdk destroy.
Any resources that you have created manually you have to remove manually as well.
Costs and limitations of this sandbox environment
Depending on the options that you have deployed, the solution will incur some costs. Since no VPC or database is deployed in this blog, costs should be very limited. For example, when running the provided glue job just a few times and scan 10 GB of data with Athena queries, costs shouldn't be more than a dollar.
Unfortunately, not all serverless services are currently available in this sandbox application. EMR serverless, Serverless redshift and serverless data streaming with Kinesis are for example not yet included. However, with the base setup provided in this repository, it should be easier to start experimenting with these components as well!


